HTPC Hardware fine tuning
Once our console is assembled, it’s important to properly configure the CPU, the RAM and the GPU in order to get the best performances and also to lower the temperatures (which is a critical aspect in SFF builds). By doing so, we can obtain up to +20% increased performances and -20C lower temperatures! We will configure CPU and RAM using the bios, while the GPU using a software called LACT in desktop mode.
In order to enter the bios, depending on the motherboard we need to press a specific key like F2 or F12 (check your manual) just after pressing the power button. It’s better for this to work to utilize an USB keyboard and not a wireless one.
[ ! ] Don’t be scared to play with the bios (but be careful and take your time to understand what the settings you are going to change do), if you read few articles and watch a bunch of youtube videos, the risk of f*cking things up is really low.
While the benefits of customizing bios settings are terrific: less power consumption, less heat, less noise, higher clock speed, better FPS and so on.
[ i ] Fine tuning is not a “copy/paste process“, the level of feasible/meaningful changes applicable depends on the installed hardware, and not only the type and model of CPU/GPU.
Case airflow and cooling system are also paramount for these kind of intervention. Regarding CPU/GPU a limit to the overclocking possibilities is dictated by the so called “silicon lottery”. The production lot and related quality of the silicon, as a matter of fact, vary from one to another and so the way it behaves when dealing with the electricity. So two same CPU models from different lots, will perform in the same way if utilized stock, but they will very likely performs in different ways after an overclocking (CPU manufacturer configure them with cautious defaults in order to ensure stability and the same base performances, but depending on our luck, we can push them further).
Updating the bios is highly recommended in order to get the latest fixes and improvements available for our motherboard and also increase the compatibility with components like CPU and RAM (especially if newer than the motherboard). It’s also a task as simple as downloading a file from the vendor website, put it on a USB drive and selecting a menu in the bios to apply the downloaded firmware. It should be the very first thing to do once the hardware has been assembled and the machine has successfully booted! Check on your motherboard manual and/or website for details.
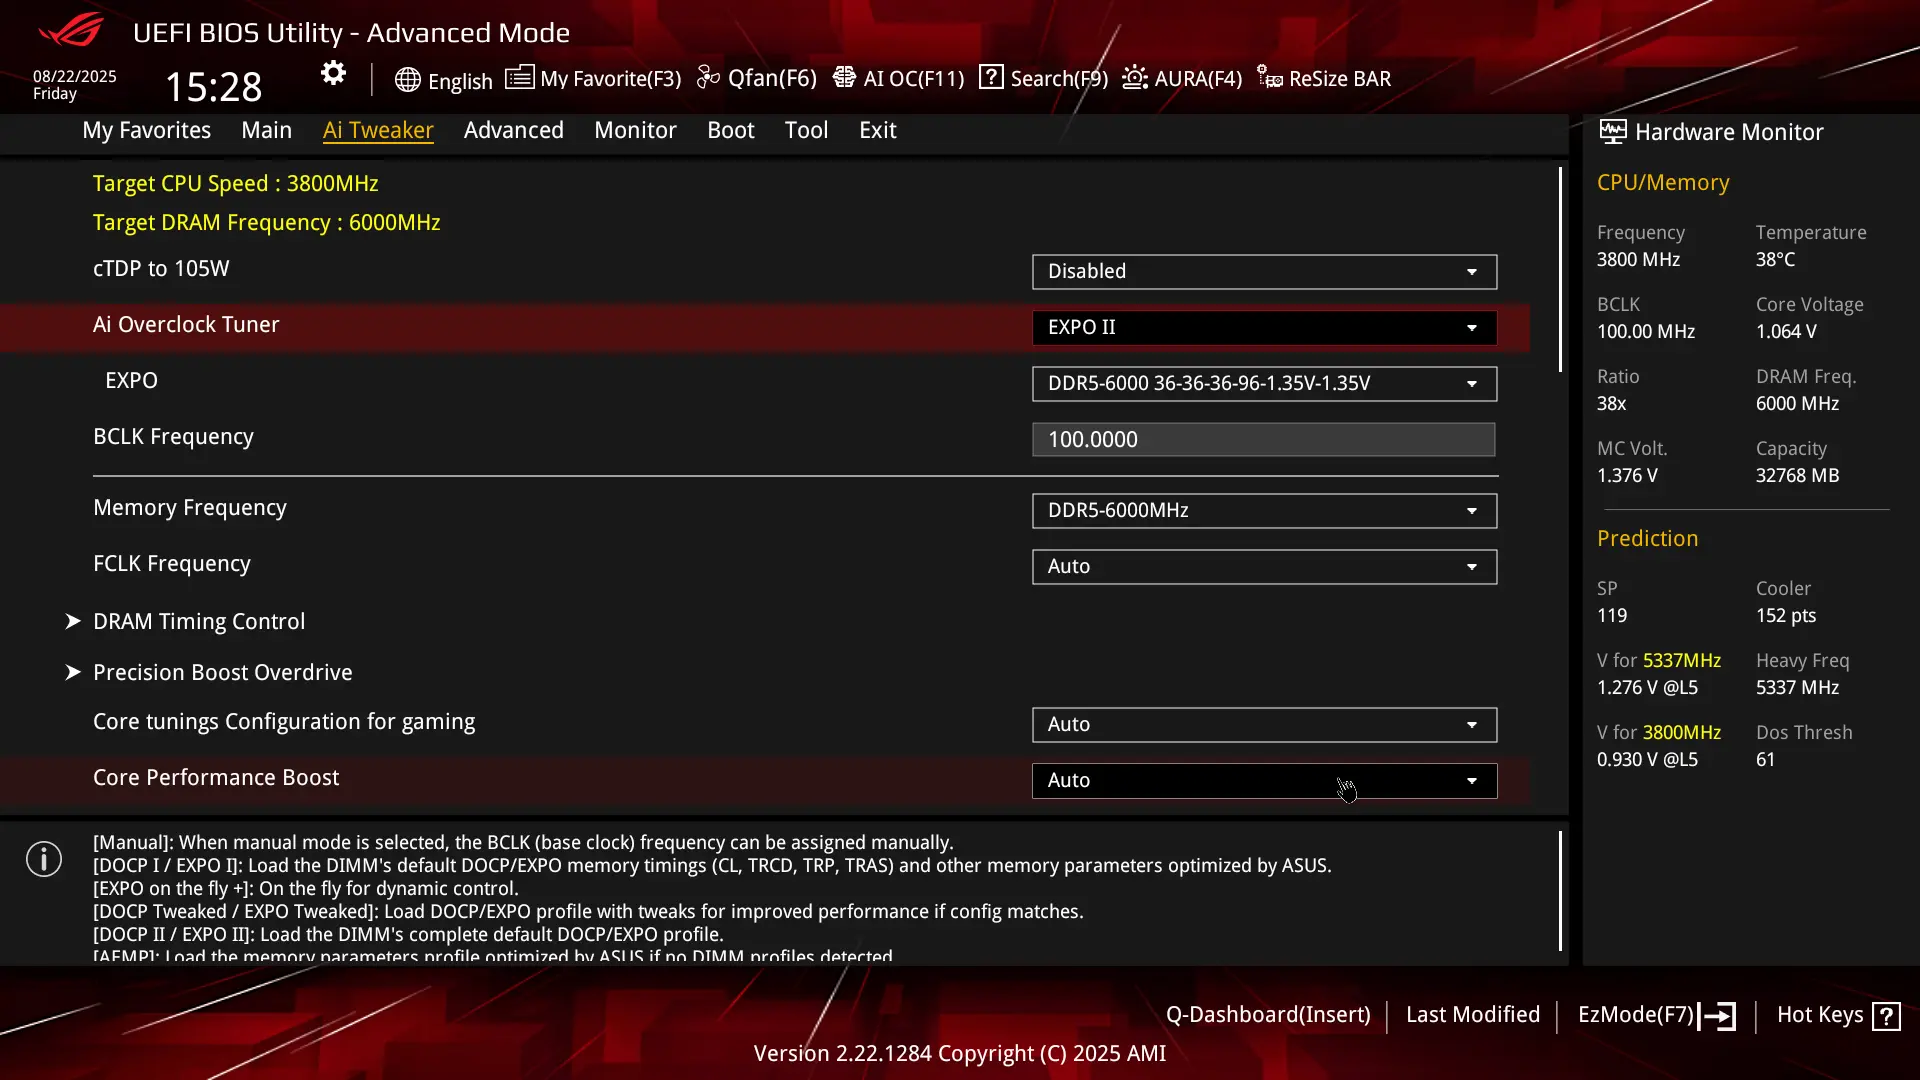
In order to get the actual RAM max possible frequency (the one that it’s advertised when you buy the kit), we need to activate the OC profile in the bios, otherwise the frequency will be the basic one dictated by the CPU (eg: 4800hz instead of 6000hz). This is the easiest thing to do because it’s just a matter of selecting the EXPO (for AMD cpu) or XMP (for Intel cpu) target profile from a dropdown menu. There are usually 3 profiles, for instance: Expo I, Expo II and Expo Tweaked. Ideally we want to activate the Expo II which contains the complete fine tuned profile as conceived by the RAM vendor, thus it should be the best one, Expo I is a limited profile loading only some vendor settings and the tweaked one is a revised variant of Expo I with customized settings defined by the motherboard. So the rule of thumb should be to activate the Expo II, test for stability (see Testing configuration stability section), keep that one if no error is detected, switch to the tweaked profile if we get errors, test it again with that profile, keep it if no errors are detected, fallback to Expo I if errors are detected, test Expo I, keep it if no errors are detected or disable expo profile and renounce to high memory speed (if this happens it’s because the installed RAM is not compatible with the motherboard and this can be avoided by checking the QVL* on the manufacturer site!).
* QVL stands for Qualified Vendors List and it’s a list of certified manufacturers and models that the motherboard vendor (eg: Asus) has personally tested itself and are granted to be 100% compatible and working as expected once installed.
[ i ] This section assumes the usage of an AMD CPU (Zen 4 or newer).
[ ? ] Zen 4, Zen 5… refers to the processor architecture and you can check it on the CPU specifications (here an example for the Ryzen 7 9700x which is a Zen 5)
[ ! ] The configuration showed in the picture below is just an example, it might be unstable with your hardware, don’t copy it blindly, read instead the process explanation carefully!
CPU Undervolt
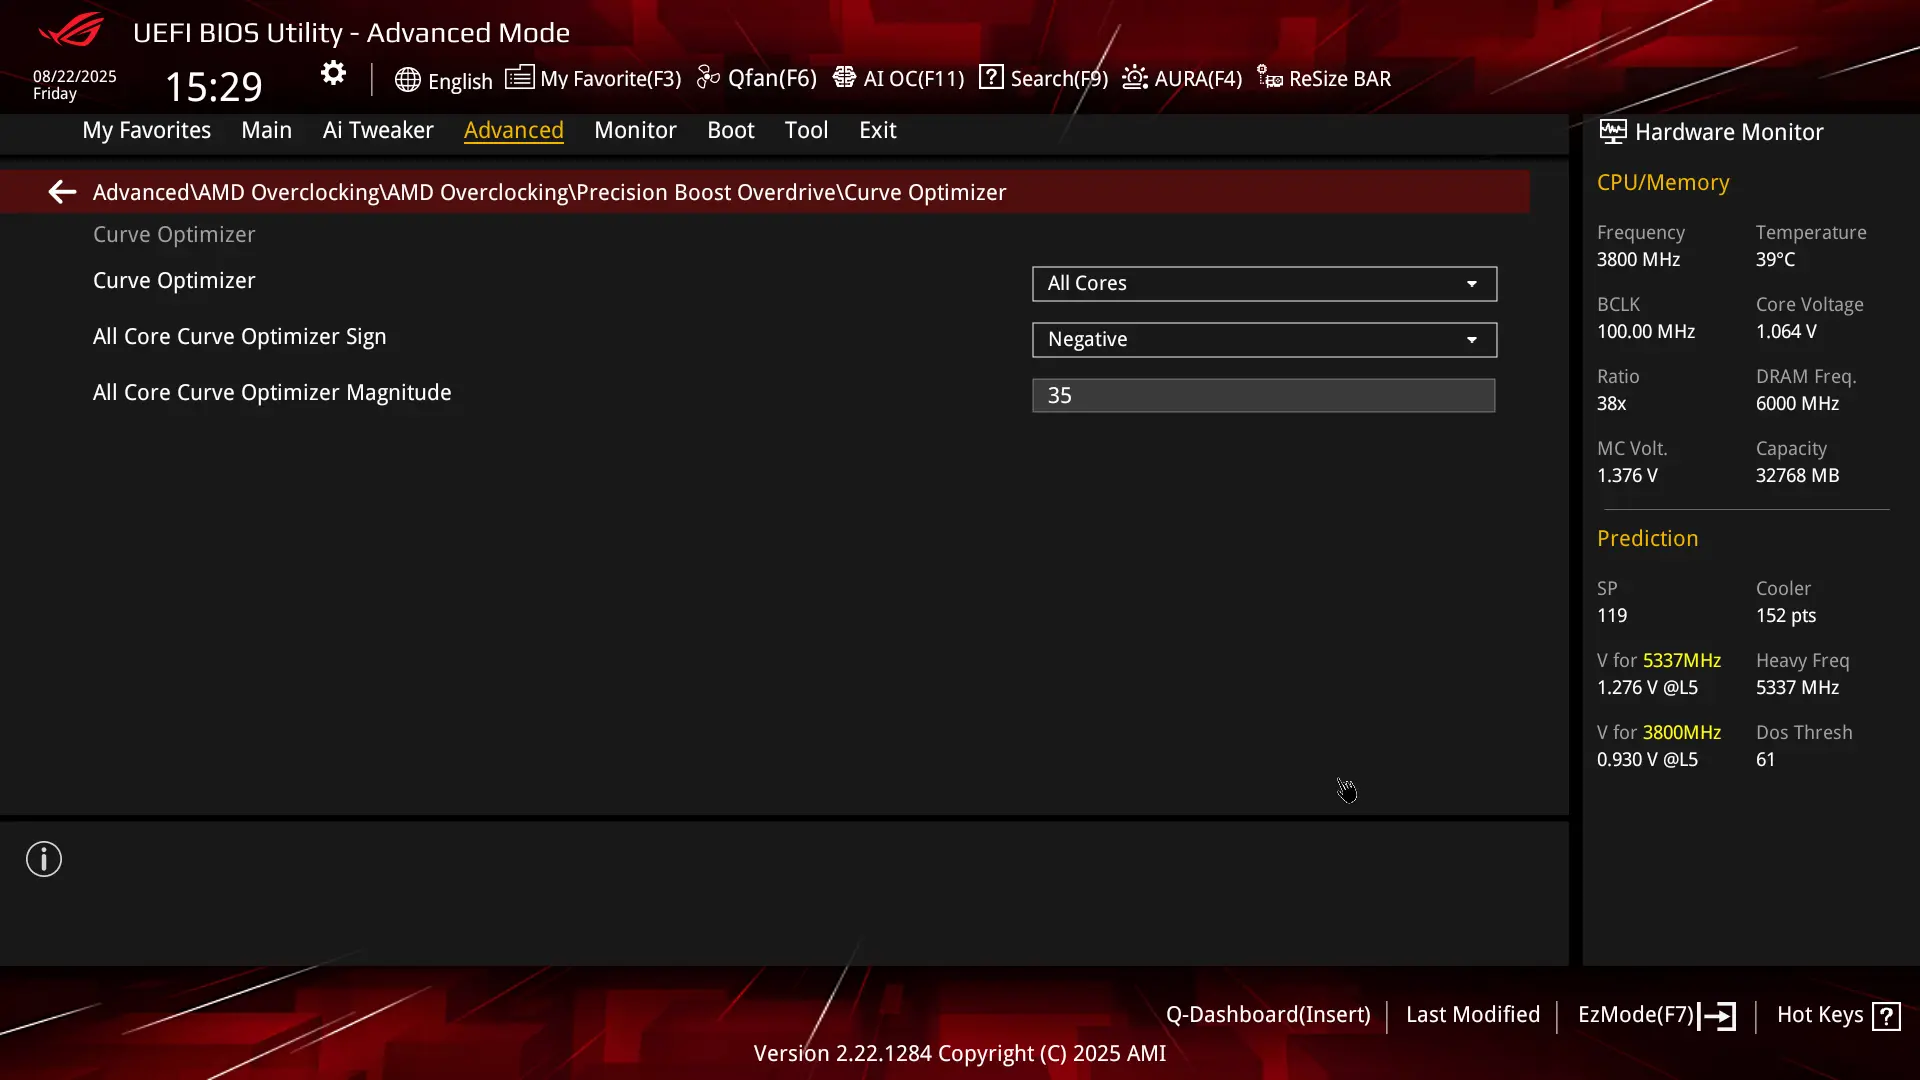
The key point in optimizing a modern AMD CPU is the undervolting. With this approach we can use less power, generating less heat and thus having both better temperatures and increased performances. We can configure an undervolt for our CPU by using the “AMD Precision Boost Overdrive” feature found under the advanced settings in the bios. Here we can set a negative curve for all the cores (it’s possible to do it specifically for each core, but having 8 cores to configure and test it’s just an insane amount of work to do, so nope, no way) and its magnitude (basically the percentage of the voltage lowering in case the curve is negative). In the best case (if we win the “silicon lottery” with our CPU), Zen 4 AMD CPU can be undervolted up to -30, while Zen 5 CPU up to -40. In my case I’ve been pretty lucky and I’ve been able to undervolt by -35 (stably). A minimum target for the undervolt which should be achievable in 99% of cases should be -20. There are 2 strategies to figure out the max possible undervolt for your CPU, one (the most common) is starting from a “safe value” which should work for everybody (like -20) and then, once verified it’s stable, increment the magnitude by 5 and test again until we get an unstable undervolt and we go back by 5 to the previous stable config.
[ ? ] Testing is paramount in order to have a confirmation of a stable system, but how do we test? We’ll use a tool like OCCT, read how to install and use it in the dedicated section here.
So, for instance let’s pretended the following happens during our undervolting job:
- we set -20 -> we don’t get any error in test …let’s see if we can increase the magnitude 🙂
- we set -25 -> we don’t get any error in test …let’s see if we can increase the magnitude 🙂
- we set -30 -> we get errors in test …The undervolt is unstable, this magnitude is too much for our CPU 🙁
- we go back to -25 (we have found our limit for a stable and reliable undervolt)
The other possible strategies works the other way around, by starting with the lower possible value (like -40 if we have a Zen 5 CPU), then if we get errors in tests (very likely in this case), we lower to -35 and so on until we don’t get errors anymore.
[ i ] Undervolting is considered a safe operation, because you can’t damage your hardware in this way, since you are just limiting the power consumption not incrementing it (which might ends up with a burnt CPU/Motherboard). So in case of an unstable undervolt, the worst thing that can happen is a system crash (the OS will reboot), so it’s just a failure at software level.
Keep the CPU as cool as possible
In order to maintain the CPU as cool as possible even after hours of gameplay, we can apply a “little nerf” to the max performance boost that can be applied by the AMD algorithm. AMD cpu have a base clock speed (eg: 3.8ghz) and a max boost clock speed (eg: 5.5ghz), so practically by default the speed will be the base one and then, if the CPU temperature is under a certain level as well as the power usage, the boost algorithm will automatically push the clock speed up to the max one, by keeping it on that frequency as long as the previous conditions (temperature and power usage) are still met later on. The issue is that with an applied undervolt (especially if we are able to reach -30 or less) the CPU is so much power efficient and base temperatures are so low that the algorithm goes nut by keeping the boost clock to its limit and even beyond constantly! 😀 The result is that it increases the temperature (by remaining however at a safe level, because otherwise it will stop boosting) and thus the fan speed of the cooler and therefore the noise. So in order to keep the CPU cooler and our console silent, we can configure a tiny constraint for the boost, by maintaining basically the same performances.
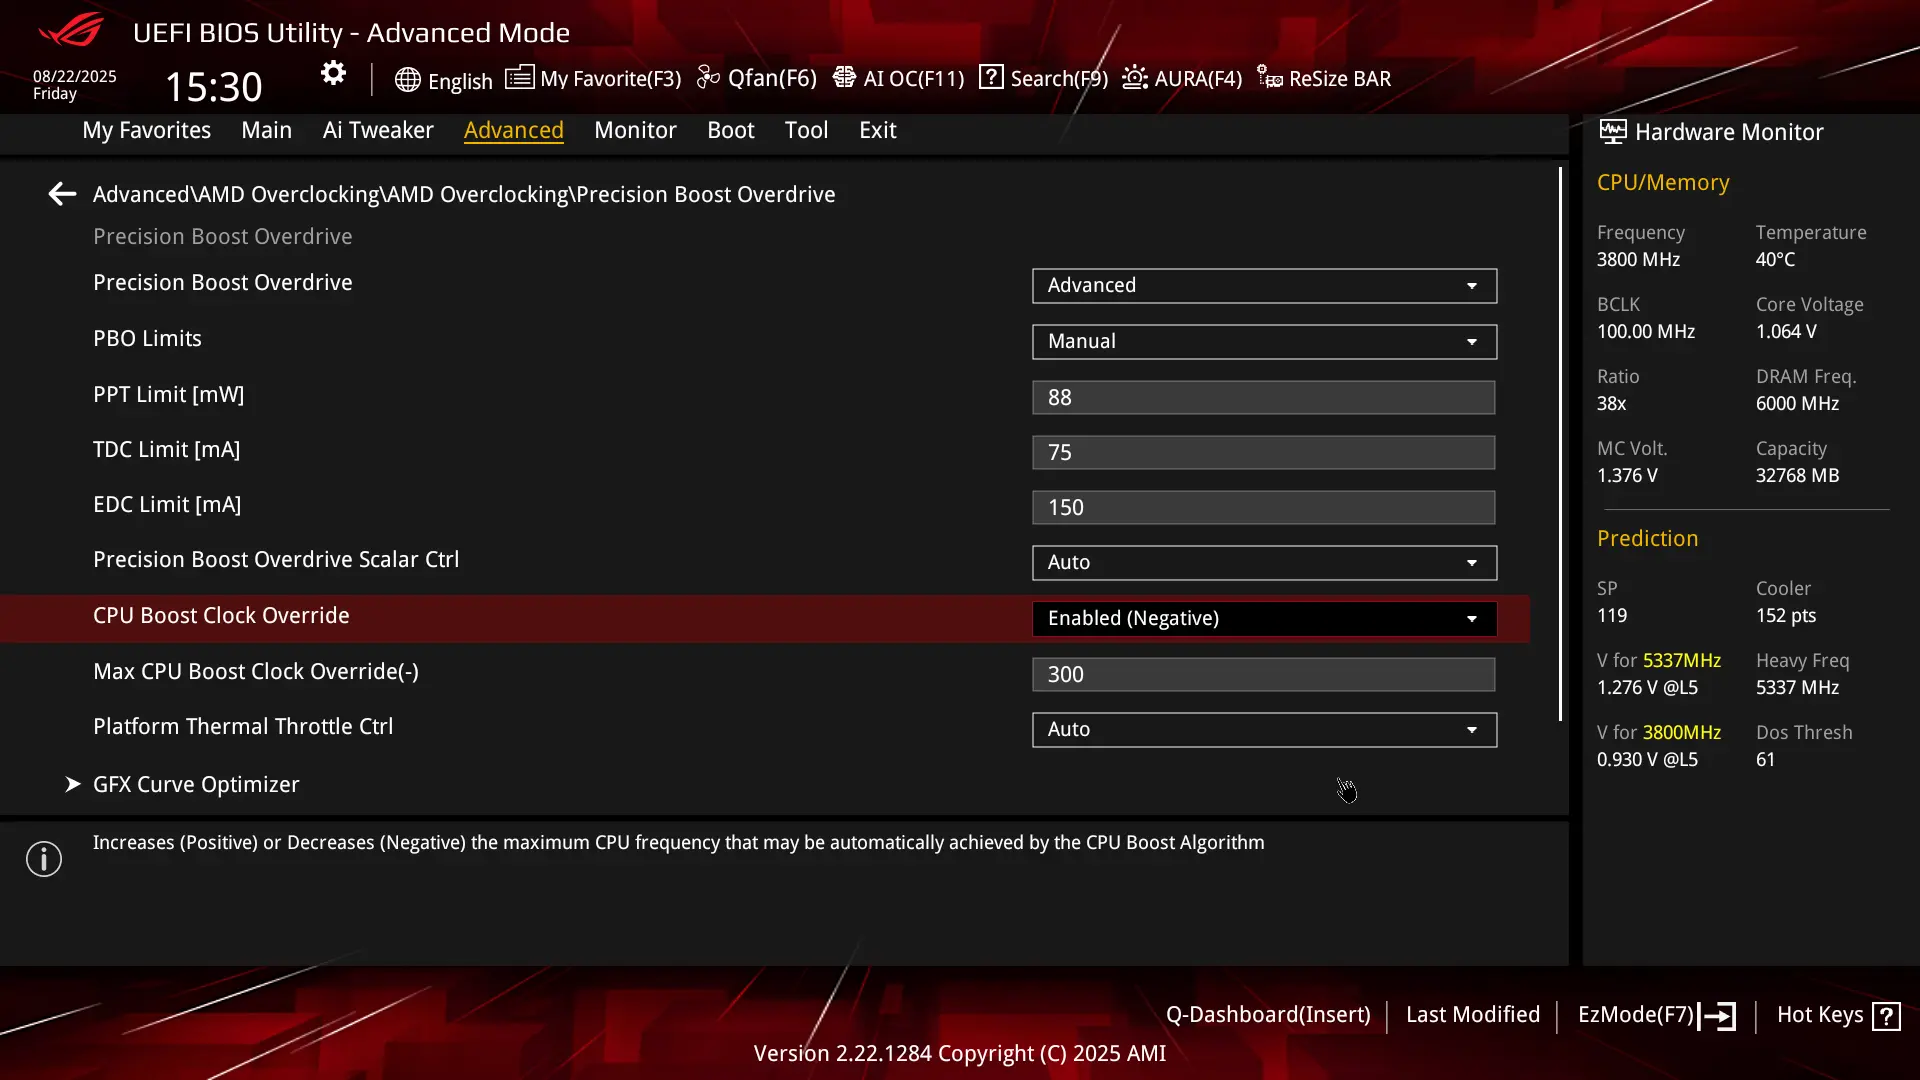
In the example above, I’ve configured a negative override of 300, this means that if the CPU can boost up to 5.5ghz, now it will be limited to ~5.2ghz (actually a little bit more, because it’s not an “hard limit” but rather a soft one). Performance wise the loss will be basically unnoticeable, but temperature wise, it will be a nice improvement, because the CPU increases the generated heat the more it gets closer to its limits.
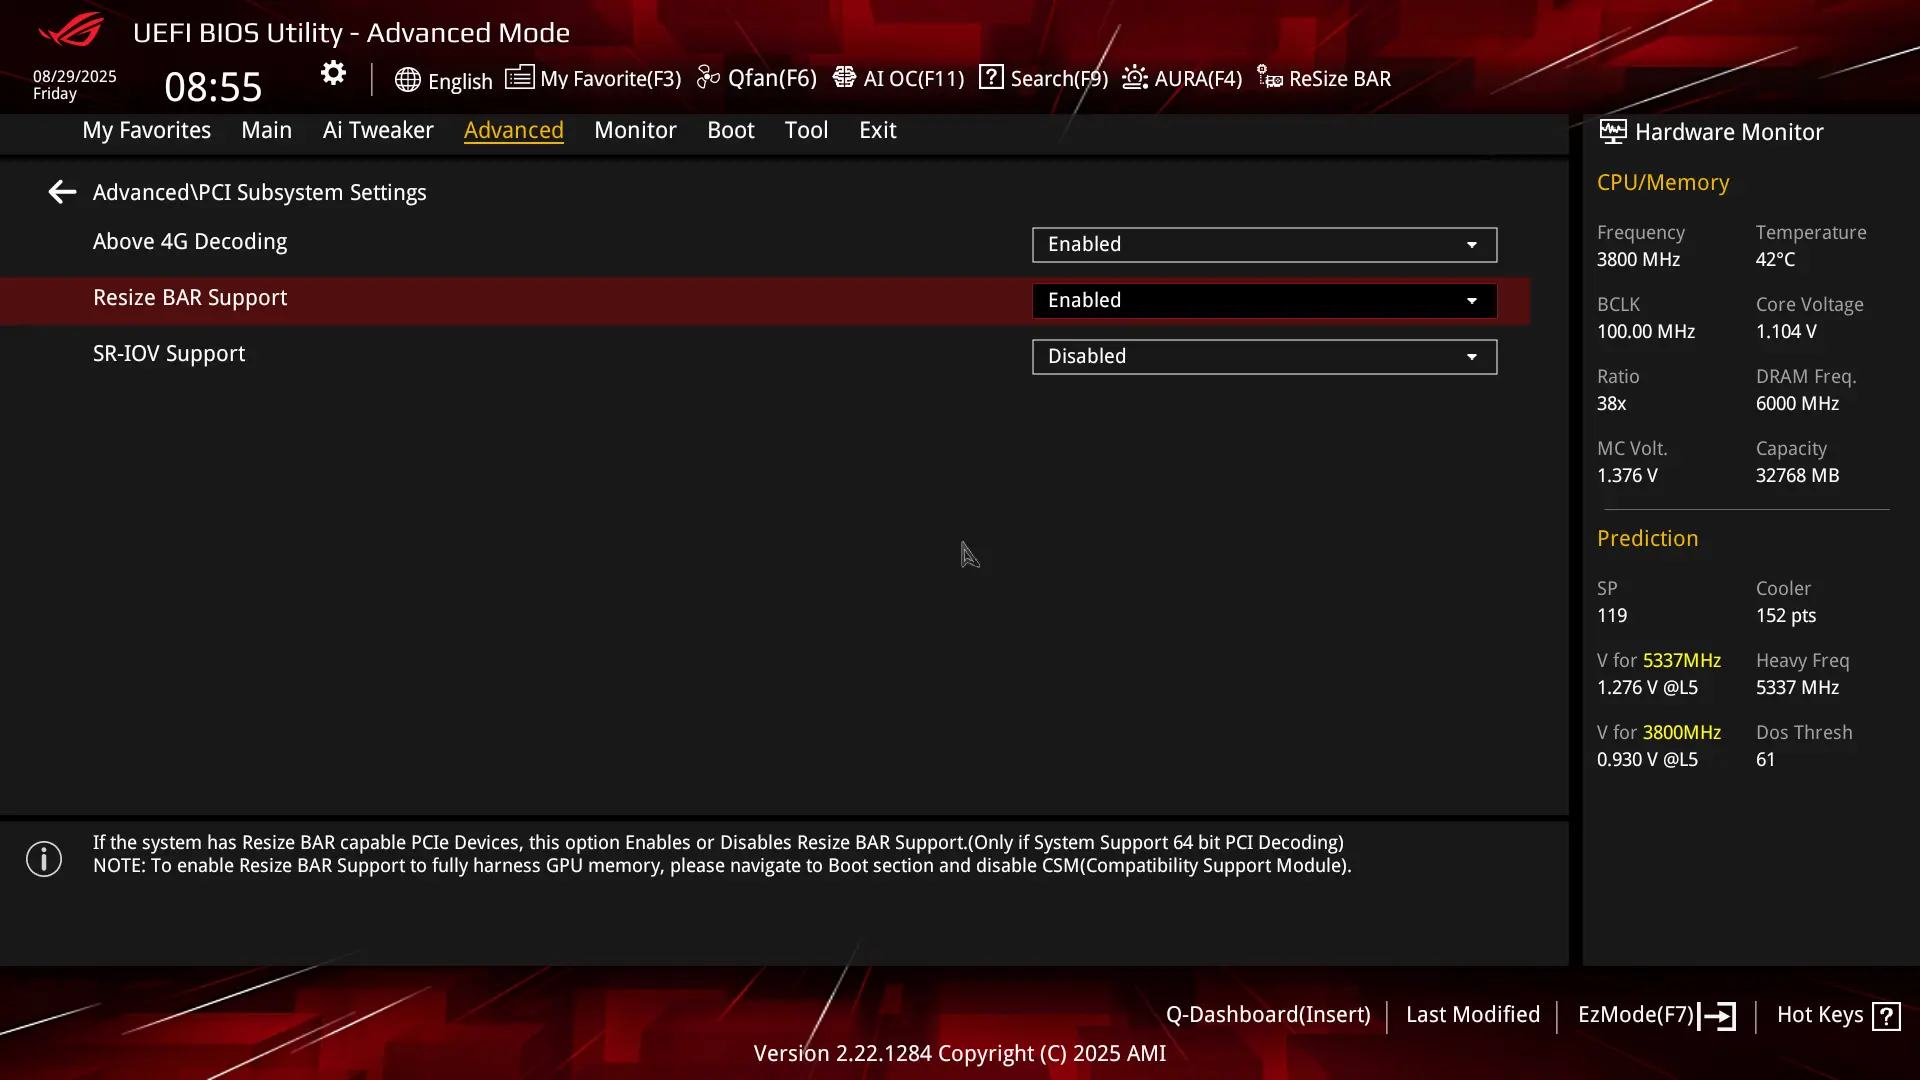
This feature allows to use the whole VRAM as needed instead of being limited to chunks of 256mb and thus requiring multiple read/write operations, the result should be a slightly FPS increase when it comes to videogames. In order to activate it, we need to click on the menu voice and toggle the option to “ON” or going to Advanced\PCI Subsystem settings and change the dropdown from disabled to enabled (this on a Asus bios, different bios might have a different option location or not having it at all).
[ i ] This section assumes the usage of an AMD GPU on a Linux system like Bazzite.
In order to customize the GPU settings Windows user are used to utilize AMD Adrenaline but unfortunately that’s not available on Linux, anyways we can customize all the main important settings using alternative solutions like LACT. In order to install LACT in Bazzite we just need to switch to desktop mode (main menu -> power -> switch to desktop) and install it using Bazaar (the app store available in the OS).
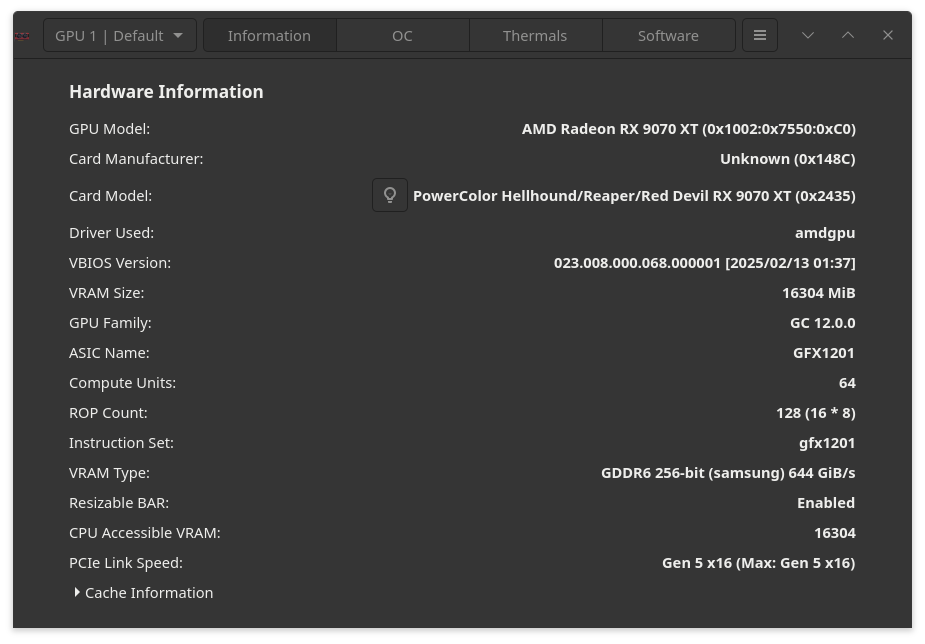
Like CPU, the key to get an optimized GPU (we are always referring to AMD hardware) is the undervolt. We can apply an undervolt to our GPU by switching to the tab “OC“, once we have first selected the target GPU (using the dropdown menu on the left top) and verified that the “Information” tab shows the expected one.
WARNING: The configuration below (OC tab screenshot) contains an actual overclock (Maximum VRAM clock) that will push the limit of the GPU beyond its designed one. While the increase in clock speed is very small and should be safe in 99.9% of cases (if the other settings and hardware are properly configured), change it at your own risk, or leave that specific parameter unchanged if not sure.
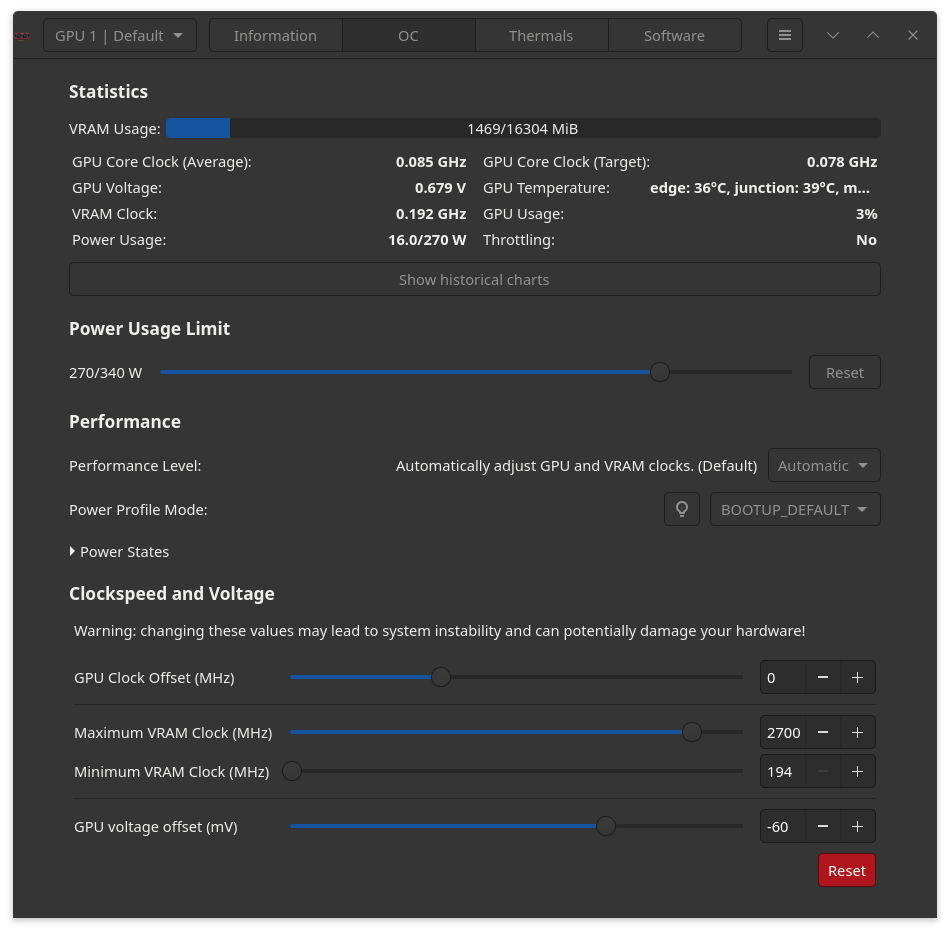
In the example above I’ve applied a negative offset of -60* to the GPU voltage, lowered the power usage limit to 270w (originally it was 317w) and increased max clock speed to 2700mhz (originally it was 2515mhz). The end result is a massive temperature drop, less power usage and a tiny performance increase.
* -60 might seem a lot, but actually many people have been able to set the negative offset to -80 or even -100 (on the 9070 XT). So, feel free to experiment (in the worst case the OS will crash). In my case I tried -70 for a while but I was getting crashes from time to time, so -60 was the ideal stable undervolt for me.
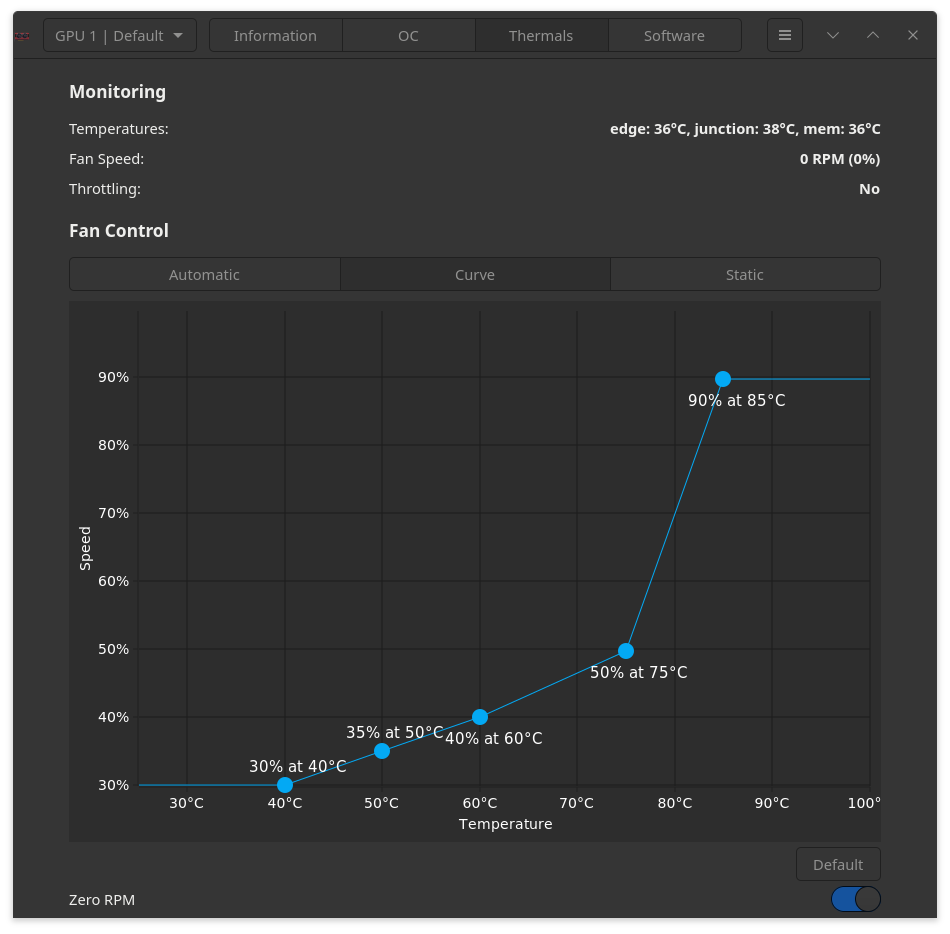
In order to have a silent console we can customize the fans curve in order to have the proper tradeoff between cooling efficiency and noise reduction. We can change the default fans curve by switching to “Thermals” tab and selection “Curve“, here we can set 5 “key points” in which we can specify the rotation speed (percentage) related to a specific temperature threshold. In the example above, the fans of the GPU won’t spin until the GPU is actually getting utilized (if the temperature is below 40 degrees it’s basically sleeping), then will start spinning at 30% of the maximum RPM (rotations per minute), 35% once reached 50c, 40% once reached 60c an until 75c (this fourth segment is the target one we are aiming for, it means we are playing our games and the GPU is working as best as it could, we are in the “comfort zone” and we want the noise to be under control, so we set the max RPM we don’t consider noisy) after this one we move to the more noisy section, with an initial slightly RPM increase (from 40% to 50%) starting from 75c (here the fans are audible but tolerable) and finally we reach the “danger zone” in which the GPU is getting really hot and we need to lower the temperature at all costs.
[ i ] The configuration above is just an example that applies perfectly to my scenario. It might very likely be not ideal for you if you have a different GPU, different case, different distance from the HTPC while playing, different environment temperature and so on. Feel free to experiment and find your ideal setup.
The best free (at least for personal use) software to test overclocking stability is OCCT and it’s available for both Windows and Linux, furthermore is also available on Steam, so it’s super easy to install. Once installed, the first thing to do is go to the settings section and configure it so that it will stop running tests as soon as an error occurs or a critical temperature (which we can specify arbitrarily) is reached, thus we will save time and avoid to stress too much our hardware for no reason (because we already know in that case that we have a configuration issue to solve). See the screenshot below:

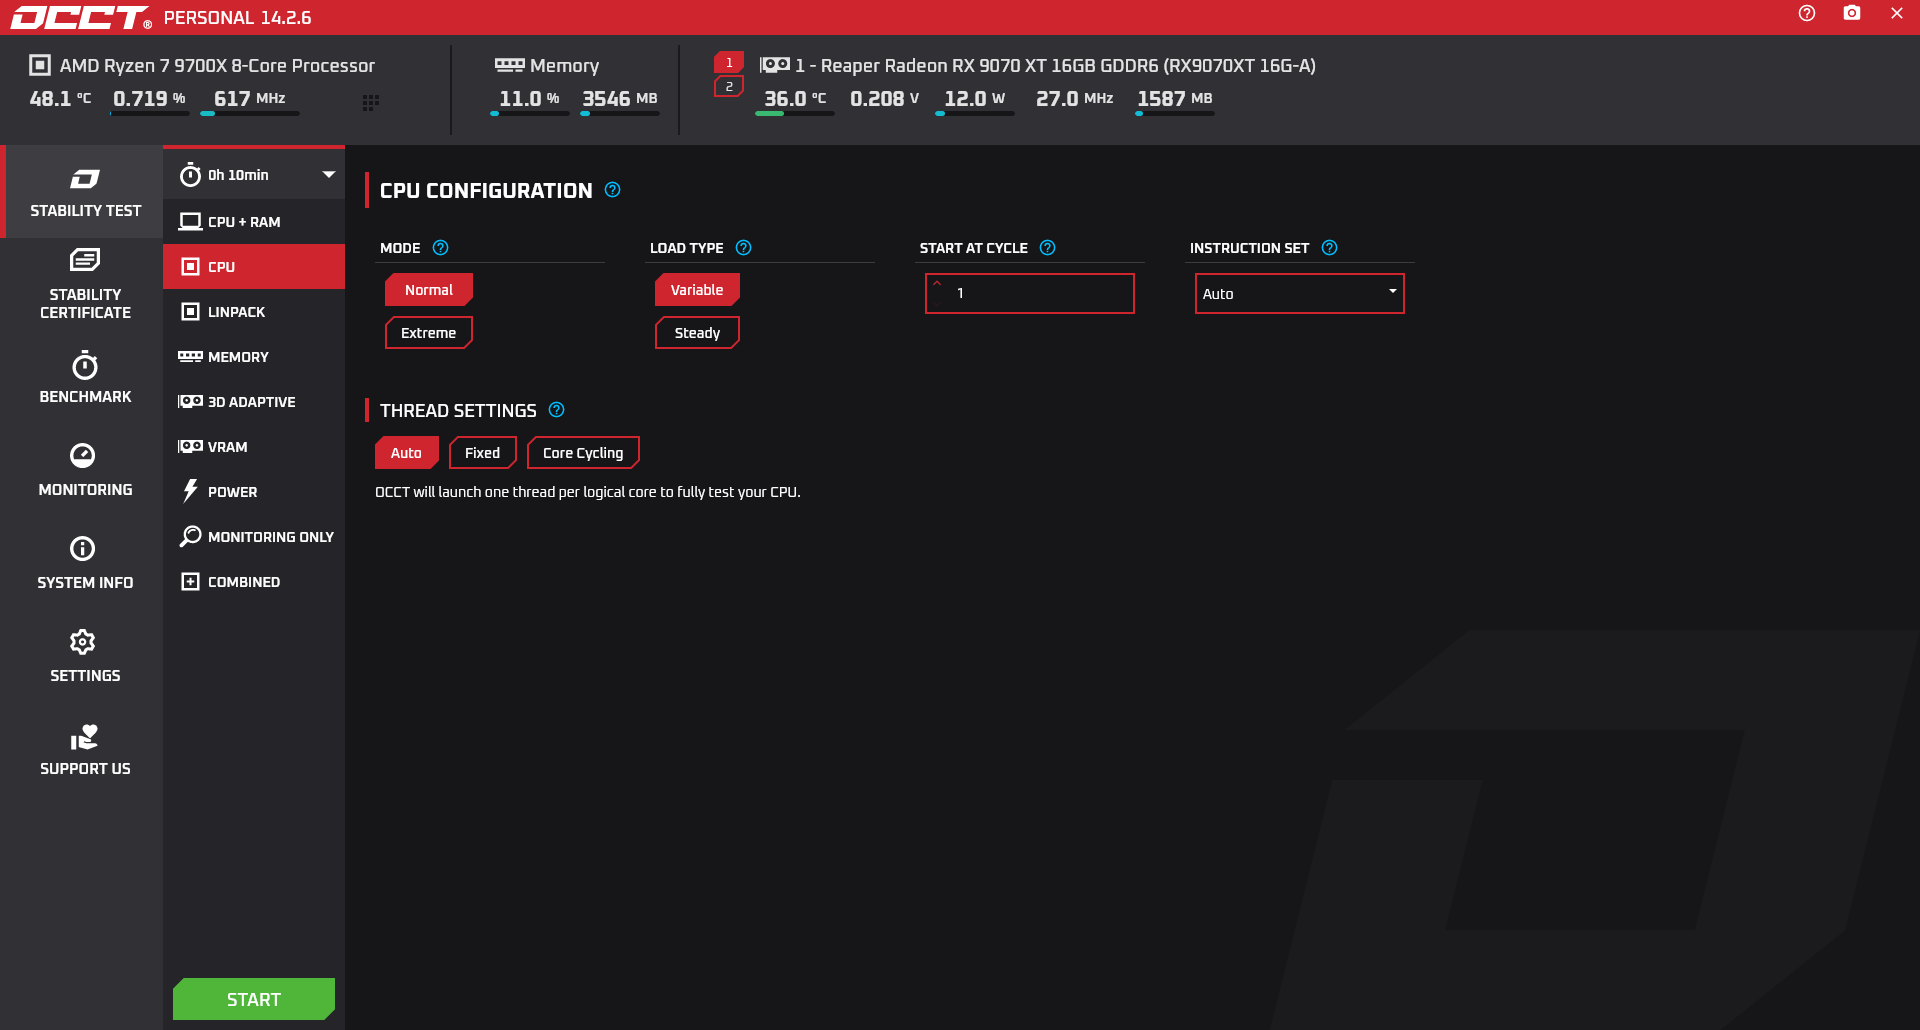
OCCT allows to run different types of test targeting different hardware, for instance: CPU, RAM, CPU + RAM and GPU. By default each test will run for 1 hour, stressing the target component(s), we can consider 1 hour test an extensive test, which if completed without any error should validate our configuration as being 100% stable. However since we are going to make several changes in order to figure out the limit for our hardware, my suggested strategy is to set the test time to “just” 10 minutes for the first tests. A truly unstable configuration will usually face several errors after 2/3 minutes, so if in a 10 minutes we don’t get any error the configuration is likely to be stable. Later on, once we found the “potentially stable” configuration (the one which has no errors after 10 minutes), we can retest it with a longer test (1 hour or even more if we can). In my case, for instance, I had a CPU undervolt of -40 that was not getting any error in a 10 minutes test, but by doing a longer test it raised errors after ~35 minutes (so it wasn’t totally unstable, but neither 100% stable). As written above, the fix in this case is to go back to the previous “less aggressive” configuration and test again.
An example of test configuration and run:
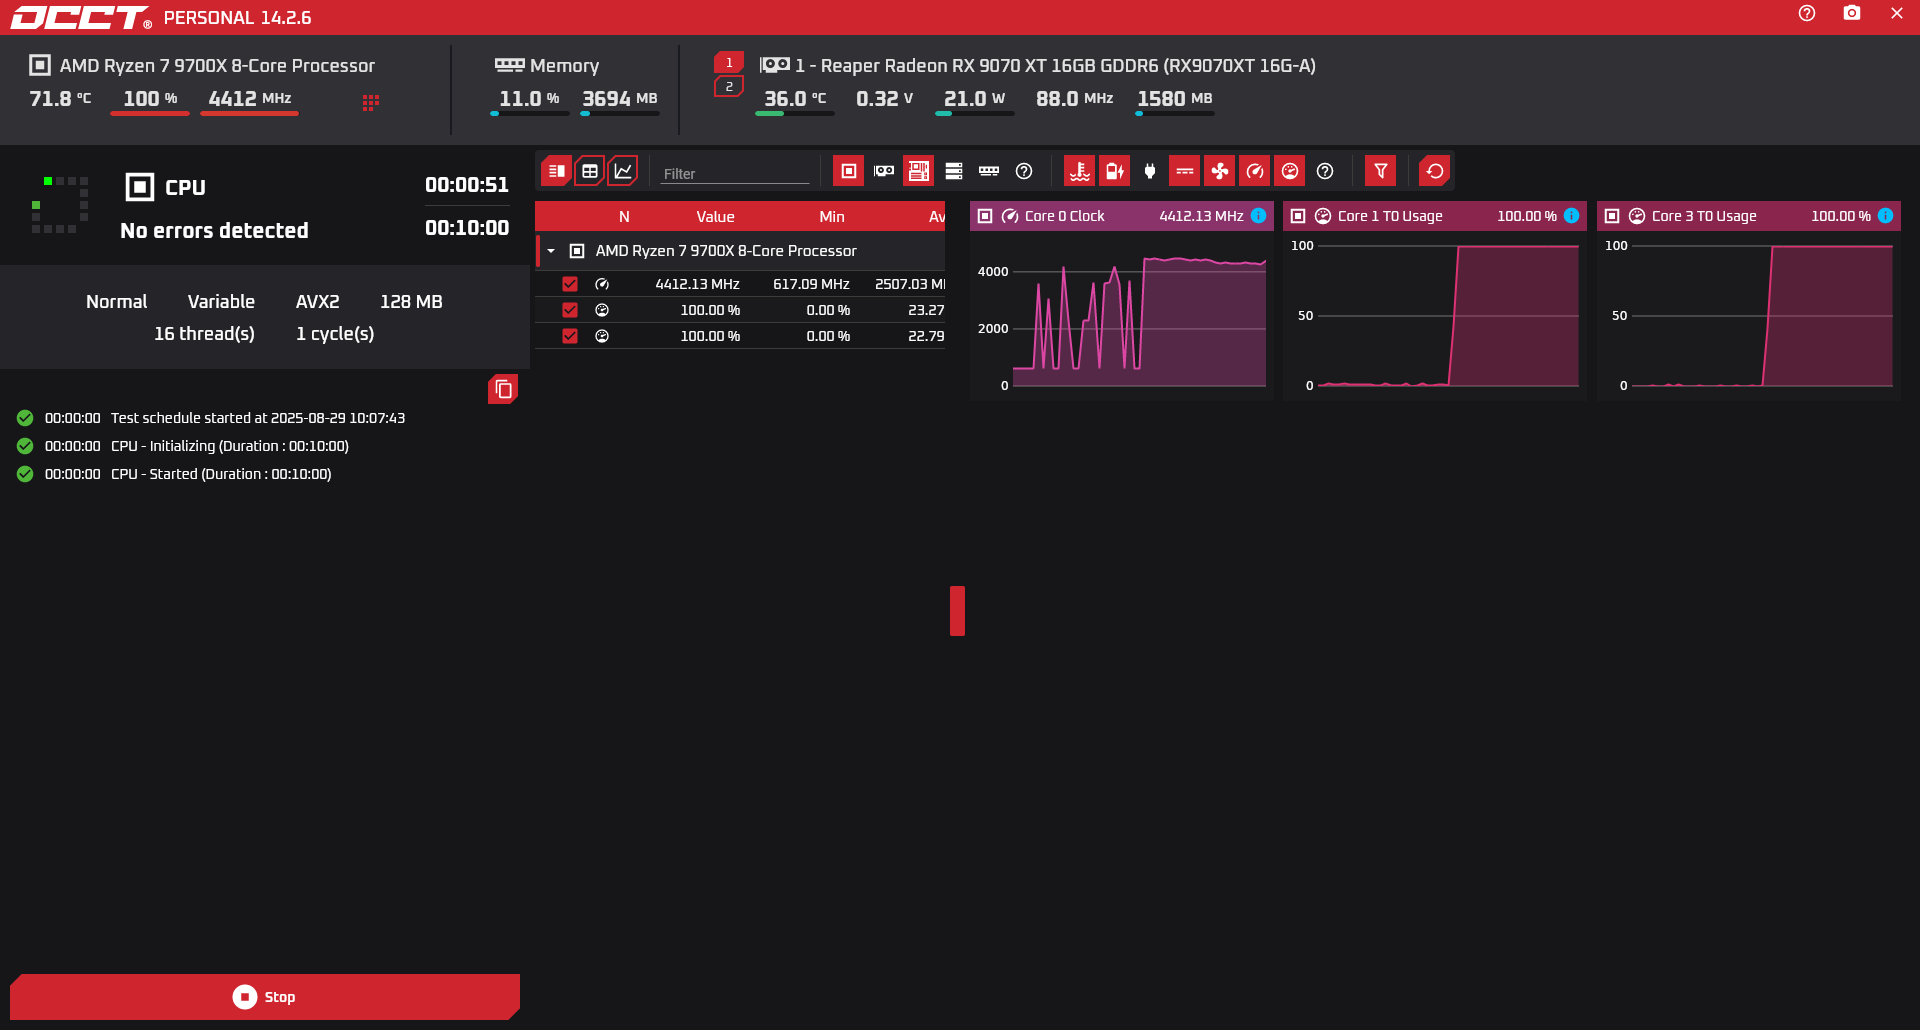
[ i ] Test one component at a time (otherwise you can’t tell which one is not ok) and don’t consider your configuration stable until you run a test at least 1 hour long for each component without getting any error!